Gear Info
Using the Eventide H910 in Control Voltage (CV) or Keyboard modes
Most Eventide H910 users will already be conversant with the Manual pitch control mode whereby the amount of frequency shift is controlled directly by the front panel Pitch control. Although described in the H910 manual, the CV and Keyboard modes are less well known and this brief guide is aimed to help you get the best from your H910.
DISCLAIMER: The information on this page is for reference only and you should not connect anything to your precious Eventide without verifying for yourself that it will not do damage to the unit. Anything you undertake is at your own risk and we can’t provide detailed technical support (if your Eventide came from us then please check with us if you have any doubts about what you are connecting or any warranty will be invalidated).
ALSO… This page is not yet as complete as we would like. Currently it’s pretty technical and won’t suit every user. We will be adding more information including a simplified version of how to connect an expression pedal to an H910 soon, however this is not straight forward as:
1. nothing with Eventides is simple 🙂
2. there is no standard wiring for control pedals and incorrect CV connection can quite possibly damage the pedal, or even maybe the Harmonizer.
Keyboard Mode
IMPORTANT: we want to make it clear that “Keyboard” mode does not mean you can just plug in a synth/keyboard – that’s actually kind of a red herring as it only refers to the Eventide control keyboard which had a unique design. Please don’t send us “can I connect my… keyboard/synth?” questions. You can’t, except for the method detailed below, which is not suitable for most synths.
Keyboard Mode is selected by pressing the “KYBD” button on the front panel. It is designed to work with the HK940 keyboard controller accessory. This is a two octave piano style keyboard. The low C represents a PITCH RATIO of 0.5 in other words, a pitch shift of 1 octave down. The middle C represents a pitch ratio of 1.0 (unison). The high C represents a pitch ratio of 2.0 representing a pitch shift of 1 octave up. Each other note represents a pitch shift equal to that number of semitones away from the middle C. Therefore playing a note will allow you to transpose the input audio by the number of semitones selected by the note.
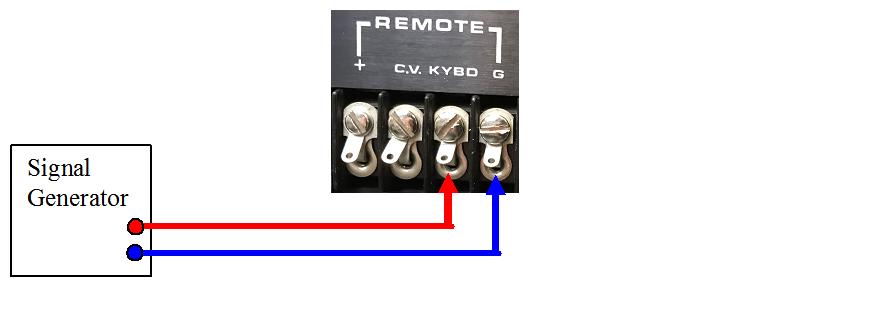
If you are not lucky enough to own one of the very rare HK940 keyboard controllers, you can still control the pitch change by applying a variable frequency with an amplitude of 5V peak to peak to the “KYBD” terminal at the rear of the H910 using the “G” terminal as the ground. Virtually any waveshape will do, but it should be symmetrical such as a sine or square wave.
There is a table at the end of this document showing the relationship between input frequency and pitch change.
Control Voltage (CV) mode
An alternative method to vary the pitch externally is by using the Control Voltage mode. Note that CV is not suited to pitch-perfect applications but can be great for pedals. It is also unlikely to work with CV out from the average synth, and we definitely can’t answer questions about particular set ups – you’ll need to read the info here and do your own experiments…
To use CV mode, connect a voltage source between the Ground terminal (G) and the C.V. terminal at the rear of the H910. Press the “CV” button on the front panel. The pitch change will now follow the voltage input. Because it is an analogue control, it is less precise than using a controlled frequency source but it enables the Pitch control to be brought out to a location remote from the H910 and could be a hand operated potentiometer, a foot pedal, or even a control voltage output from a synthesiser.
The pitch range is the same as when using the front panel Manual pitch control. Because this is an analogue control, there will be variations from device to device. Typically, a pitch change ratio of 0.50 to 2.00 will require an input from +1.2V to +9.4V but take care not to exceed +15V or the H910 may be damaged.
The safest way is to utilise the voltage output from the H910 itself. This is available at the “+” terminal on the rear of the unit. Although the open circuit voltage of this terminal is around 15V, it is from a relatively high impedance source and will usually supply less than 10V when connected to C.V.
When using a potentiometer, the wiper should be connected to “C.V.” and the ends of the track between “+” and “G”. Use a 10K Linear device.

As already noted at the beginning of this article, ideally we would now conclude by pointing you at an off-the-shelf expression pedal that you could use with your H910. The information is coming once we have the time to run some tests ourselves – we’re hampered by the fact that there is no single standard for the wiring of such pedals so it’s trial and error. If you want to know more about Expression Pedals in general then this page from Mission Engineering is an excellent resource. Please be aware that if you connect up a pedal incorrectly you run the risk of damaging the pedal, and possibly also the Eventide.
======
The following table shows the relationship between input frequency (KEYBD mode), Control Voltage (CV Mode) and the resulting pitch ratios to raise and lower the pitch by plus or minus 12 semitones.
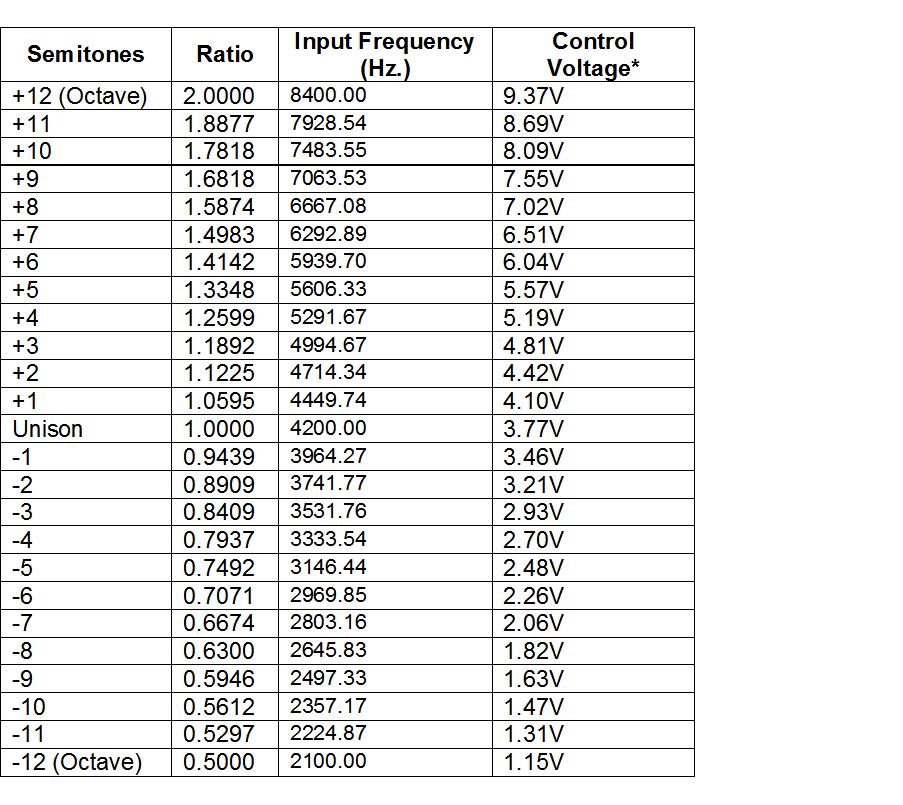
*The control voltages are shown for one of our H910s. Due to the tolerances af the circuitry which was never designed to be accurate, these could easily vary by as much as 10% for any given pitch change ratio.
When using KYBD mode, the relationship between pitch and input frequency should not vary from device to device if properly calibrated.
======
We buy and sell Eventide Harmonizers, specialising in the H910 and H949 units which we overhaul and then deep test to the highest standard (finally running them for some time in our studio before we sign them off). If you are looking for one of these machines get in touch, and if you have one to sell in any condition please contact us now.
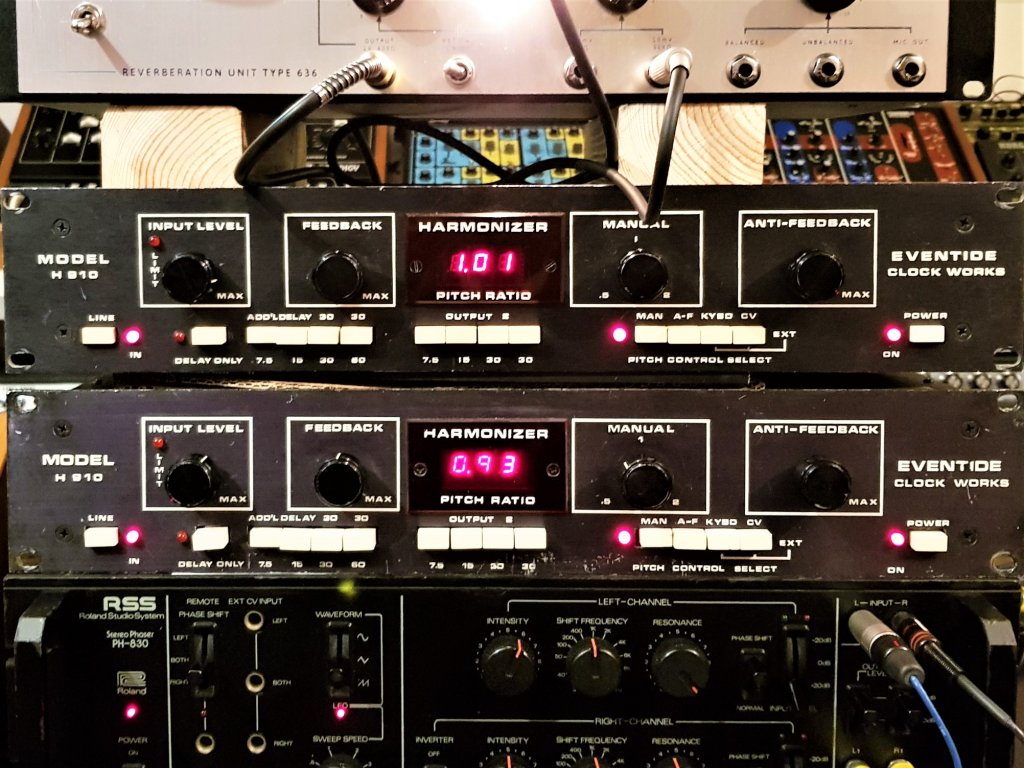
Eventide H910s on test in the Soundgas Studio: